|
Audacity .... |
...A powerful
free software for all audio tinkering |
|
|
|
|
|
|
|
|
Generating
sound effects... Following are a
few effects which one can easily add to the sound file in hand. Carrying out
all these yourself and listening to the result is the best way to learn. These
lines here just make a beginning easier for you. |
|
|
|
|
|
|
|
1 Amplifying the recorded signal. 2. Boosting bass frequencies in the recorded signal. 3. Cutting off either high frequencies or low frequencies. 4. Adding echo. 5. Removing background noise, especially in recorded speech. 6. Removing clicks. 7. Applying Fade-In and Fade-Out effects. 8. Mixing voice. 9. Removing voice from song. 10. Changing pitch or tempo of the sound. Each one of these
is discussed below.
|
|
|
Portable very small voice recorders like this one are quite handy for recording speeches. However, back ground noise will have to be removed using Audacity as explained above. |

|
|
|
Removing clicks. Clicks which you hear in the recorded
sound are seen as sharp peaks seen in the waveform. These look like the ones
seen below. When these are viewed with X-axis magnified view these are seen
as single high amplitude waves. 1.
You can select the portion of the click by mouse 2.
Reduce its amplitude by the option of “Amplify” under the
tab called “Effects” 3.
Amplification level is to be set at a negative value. Or you can go to “Remove Clicks” option
under the tab “Effects”. Use different threshold levels by trial and error
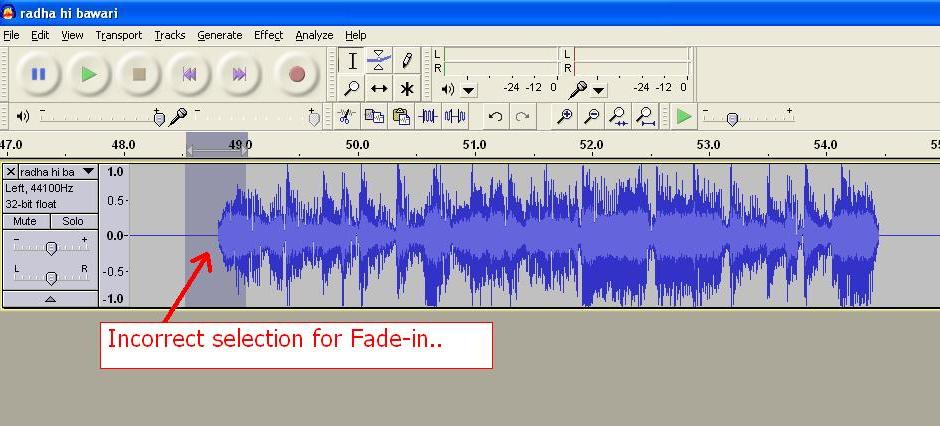
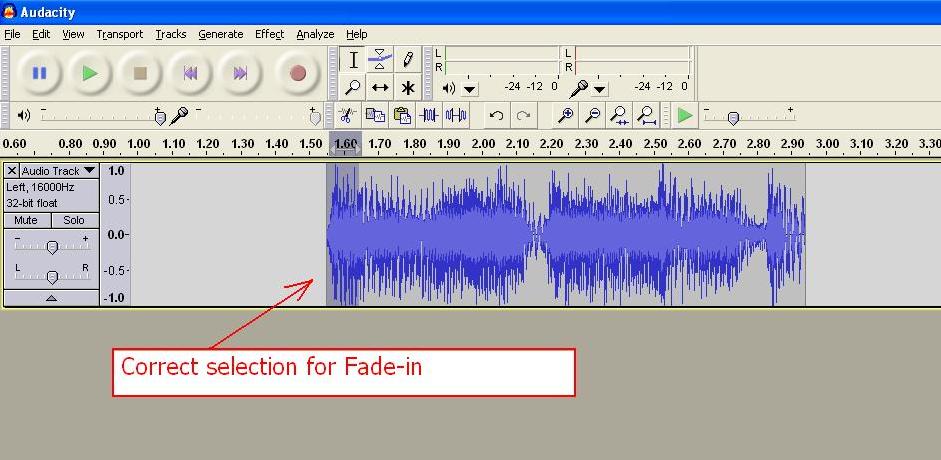
and listen to the result before saving. Applying Fade-In and Fade-Out effects. When the volume of the recorded signal increases slowly over two or three seconds at the beginning, the effect is called Fade-in. When the volume of the recorded signal decreases gradually over two or three seconds at the end of the recording it is called Fade-out. This gives a pleasing effect against the effect which you get when the song suddenly starts playing loud or it stops suddenly at the end.
1. Select a portion of two or three seconds of the song at the beginning. 2. Goto the tab of “Effects” 3. Choose option called Fade-in. 4. Do exactly same for the end portion and apply Fade-out. 5. Save after listening Tips.. If the portion selected extends beyond the recorded signal, the effect applied will not sound good. Therefore, let the selection begin exactly at a point where recording begins. For fade out effect let the selection end exactly at the point where the recording ends. See the pictures below which show correct and incorrect selections.
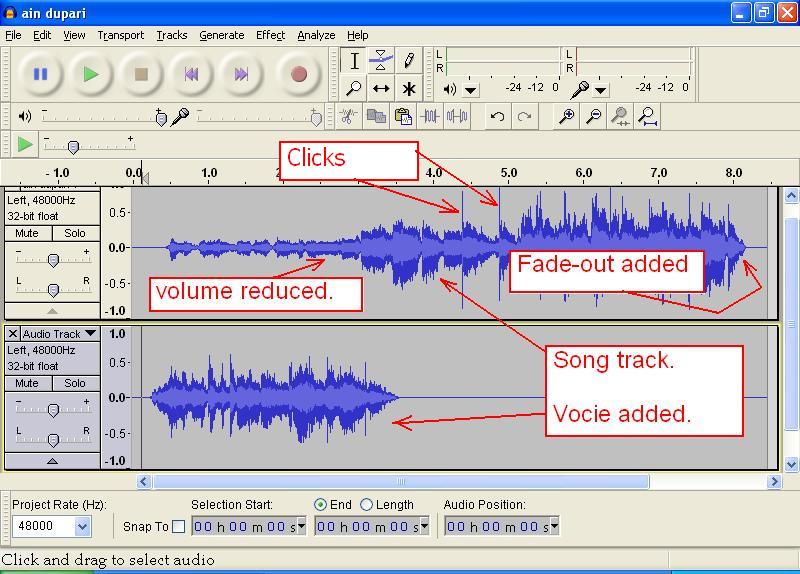
Mixing voice. Consider a case where you want to add
your voice at the beginning of the song. The following will give a nice
effect for the listeners. 1.
Open the sound file in audacity. 2.
Place the cursor at the end of the file on extreme right
hand side. 3.
Connect the microphone to the Mic input of the sound card 4.
Ensure that the microphone is not muted and the volume is
high. 5.
Click the red button in Audacity 6.
Start talking into the mic. 7.
Press Black Stop button after you have recorded the
speech. 8.
Compare the amplitudes of the two waveforms, i.e. that of
the song and that of the recorded voice. If the level of the voice signal is not
matching, bring it to the same level through “Amplify” option. 9.
Goto the tab called “Tracks” and choose option of “Add
stereo tracks” 10.
Copy the voice patch and paste it in the beginning on the
newly added tracks 11.
Reduce level of song above the voice patch through
“Amplify” option. 12.
Apply fade in to the song where the voice patch just
finishes. 13.
Listen to the effect and save the project under a
different name so that your song is safe. 14.
Select all the four tracks using mouse. 15.
Goto the tab called “Tracks” 16.
Click on the option of “Mix and Render” 17.
This will mix all four tracks into two tracks giving a
stereo signal 18.
Save the file with another name. 19.
Saving intermittent steps under different names helps in
retrieving changes. Here is a sample of a tune which you can download and listen .
The Audacity features like recording, fading, mixing tracks etc have been
used in creating this sample tune. The other sample here
which can be downloaded shows use of the Audacity features whereby you
can increase the tempo of a tune without affecting the pitch. Tempo of the
end portion of the tune has been increased. These tunes have been recorded
again and again ( overdubbing ) for getting a feel of several instruments
being played simultaneoulsy.
Removing voice from song. This effect looks very attractive because one gets a feeling that
it is very easy to make “Karaoke” songs from any song in hand. The technique
is described here. However, it is many a times impossible to remove the
vocals totally. When a stereo song is recorded the singer is assumed to be in
the center, with accompanying instruments on side. Look at the picture below.
A , B and C are the three signals produced. There are two microphones called,
Left and Right. It can be easily appreciated that the microphone called
“Left” will record the signal from A
strongest and that from B weakest. Similarly, the microphone called “Right”
will record the signal from B strongest and that from A weakest. However, the
signal from the center source (C) will be of equal intensity in both the
microphones. Here lies the secret of canceling the signal from centre source
( which is normally voice signal ). If the recoding from one of the
microphones is subtracted from that of the other microphone, A and B will
remain but C will be eliminated. To achieve this in Audacity, there is an
option to “Invert” one of the channels of stereo signal ( after splitting it
into two mono tracks) and adding these together !! It is misleading to say
that voice can be removed. It would be more correct to say that sound from
the centre of the stage can be removed or reduced. Since a singer normally
sits in the center, one can say to some extent that voice can be removed. Here is a website which offers services ( free and paid ) where
you can try uploading a song and they will remove vocal from it and send it
back.......... ! Click here to visit that
site...
Practically, the effect is not as encouraging as it sounds from
the above theory! If any one has found out a better way, comments are welcome
at ...
|

|
|
|
Creating mp3 file from Audacity project file
After all editing, if one desires that the resulting song be
converted into mp3 format, there is a way out in audacity. For this, you need
to download a file called lame_enc.dll from the link below. Keep this downloaded
file in the same directory where you have your audacity program stored. When
this is done, select the portion of the song or entire song, goto the tab
called “File” and choose option of “Export selection as..”. A new window will
appear where you can select the file type as “mp3” and save the file with the
name you want. No need to give extension. If lame_enc.dll file is missing on
your pc, the option of file type “mp3” will be invisible.
Changing pitch or tempo of the sound.
It is interesting to listen to these effects. Those who will recall the days of gramophone records or even cassette recorders are familiar with the effect one gets when the vinyl record spins slower or faster. When the speed is higher than the normal, not only the tempo increases but also the pitch of the voice goes up. The same thing happens if the audio cassette runs faster than the normal speed. You can not increase the tempo without increase in pitch. Also, you can not increase the pitch without increasing the tempo.Both these aspects are bound to each other. However, in digital audio, you can change any one without touching the other one! This sounds very interesting. The secret lies in the method by which the digital audio is stored. Audacity can do this for you in a very simple way. Audacity gives three independent options as under.
a) Changing tempo without change in pitch
b) Changing pitch without change in tempo
c) Or change ptch and tempo together.
1. Select the portion of the song for which you want to achieve this effect.
2. Goto the tab of “Effects”
3. Choose one of the above three options and execute the command appropriately, i.e. applying the correction either upwards or downwards.
4. Save the file if required.
|
Beginner's guide to
Audacity... |
|
|
|
|
|
|
|
|
|
|
|
|
|
|
|
|
|
|
|