|
Vacuum Forming at home......... |
|
using a vacuum cleaner
|
|
|
|
|
Here are some details of Vacuum Forming tried out by me at home...
I am thankful to the authors of all those sites which have given
quite a detailed information on many
aspects of Vacuum forming. Click
here for one such site. Exposure to
a few local professional vacuum formers also helped to a great extent.
PVC ( PolyVinylChloride) and HIPS ( High Impact Polysterene) were
found to be common materials used by many. Although other materials like ABS,
PP, HDPE, etc. can be vacuum formed into different shapes, PVC seems to be the
choice of quite a few. PVC, however, has a limitation that the vacuum formed articles can not be joined to
other pvc objects by normal electrical heating. PVC requires Radio Frequency
Heat Sealing equipment, when it comes to joining PVC to PVC, offcourse leaving
aside adhesion using solvent chemicals.
Since this was my first attempt, the scale was kept low and a size
of pvc film close to A4 was consiedered enough to try out.
|
|
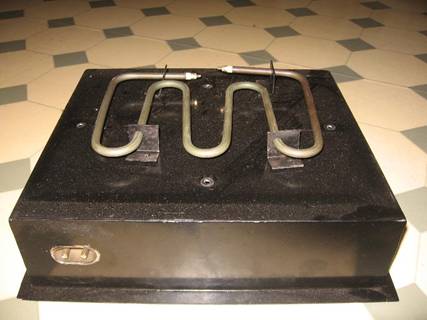
The photograph below shows a cover, in orange colour, made of Mild
Steel fixed around the electrical
heating element. Plastic sheet to be vacuum formed is first kept over this
heater. The walls of the cover have been made slanted purposely. Heating
element kept at the bottom has some clearance from the side walls. Had the
walls been vertical, the edges of the sheet to be formed would not have got the
heat. Slanted walls have solved this problem. Pieces of three mm thick Asbestos
sheet were fixed on the inner side of the cover to avoid heat lost in heating
the metalic part. These are not visible in the photgraph as they were fixed
after the trial was taken.
The opening of the cover measures 11 inches x 9 inches on top and
13 inches x 11 inches at the bottom. Slanted height is 4
inches. Thickness of the sheet used is 16 gage. All parts are later on powder
coated.
|
|
You can see a bent heater being assembled on an inverted Box made
out of 16 gage sheet Mild Steel, in the photograph below. The heater is of 1 kW
at 240 volts AC. Overall size of the heater is approximately 10 inches x 7
inches.
L-shaped MS brackets are used for supporting the heater about 3/4th
Inch above the metal box. Asbestos sheet for avoiding heat being wasted into
heating of the box was put below the heater before assembly.
Some heat is expected to get lost to the MS box through small
contact of heater with the L-shaped brackets. But this can not be avoided
with metalic parts touching the heater.
Electrical power is connected to the box through an iron socket
arrangement seen on the side. This is the back side of the assembly. Mains ON /
OFF and two lamps to indicate the Presence of Power and Status of Heater ( on
or off ) are on the front side, not seen here.
|
|
|
Here is the heater section almost ready with thrmostat in front,
asbestos sheet in place and heater mounted with four MS barackets. Two more
brackets are used to hold the thermostat tube close to the heater.
|
|
|

|
|
|
|
|
|
|
|
|
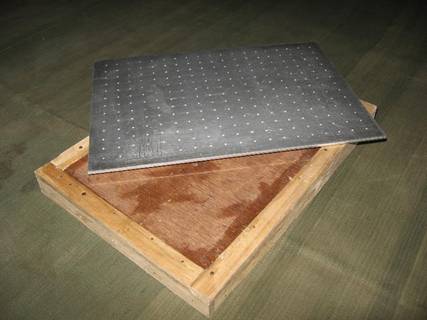
Photograph above shows aluminum plate, before fixing on the wooden
block board. 5 mm thick wooden border all along creates the necessary cavity
below the aluminum plate. This acts as a vacuum chamber. A plastic pipe,used as
a drain for wash basins is readily available in hardware shops, is fixed from
the bottom side ofthe wooden block. A domestic vacuum cleaner can be connected
to this pipe for creating the vacuum necessary for forming.
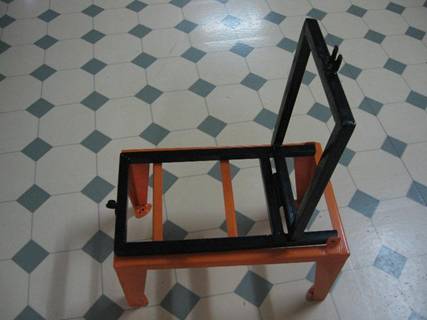
The photograph below shows vacuum table stand with hinged frame
made of ¾ inch MS sqaure tube. Two orange colored angles seen in this
photograph on the left side are used for fixing the vacuum table. Four strips
of cut pieces of old floor carpet were stuck on the inside of the frame by
using an ahesive, popularly known by its trade name as Araldite. This helped in
providing a good grip on the plastic sheet being clamped and heated in the
frame.
|
|
|
|
|
|
Vacuum table is made using a block board of 3/4th inch thickness
and one aluminum plate of 4 mm thickness with holes drilled all over. The
Aluminum plate is fixed on the wooden block board with a 1/4th inch
spacing in between. The air gaps are sealed by using Fevicol, an adhesive used
by carpenters. This creates the vacuum chamber 10 inches x 7 inches x 1/4th
inch. Below the wooden board is a flange and pipe for connecting to domestic
Vacuum Cleaner. The hole size chosen was 1.5 mm. Many professional tables were
seen using this size. Smaller the size probably is better so that the softened
plastic material is not pulled in the holes due to vacuum force. At the same
time enough vacuum pressure should pass through the holes for applying pulling
force on the softened plastic material. Holes have been drilled at corners of
squares measuring half inch x half inch. Total 247 holes!
A small drop of diesel just before drilling a hole helps fast
drilling without the bit getting overheated and wearing out quickly. A swinging
bolt with a Knob welded to the side of the frame, is seen in the photograph.
This is used for tightening the top
frame over the bottom frame and hold the plastic sheet firmly. A strip of
rubber of about 1 mm thickness was pasted on the inner sides of the frame to
provide the grip on the plastic sheet to be formed.
|
|
Seen below, is a plastic pipe of 32 mm diameter which fits to normal domestic vacuum cleaner. A Sqaure shaped MS plate is put around the collar of the pipe to attach the pipe to the vacuum table.
|
|
|
|
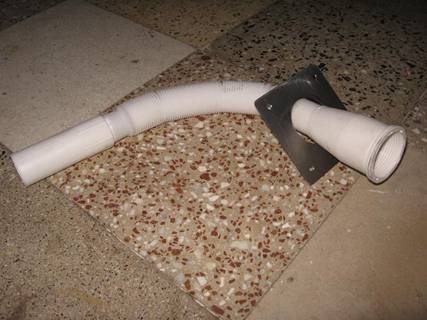
This is the bottom side of the vacuum table. Tigthening the four nuts on the sqaure shaped MS plate holds the plastic pipe firm against the vacuum table. Just below the sqaure plate is a 1 inch diameter hole drilled in the wooden block.
|
|
|
|

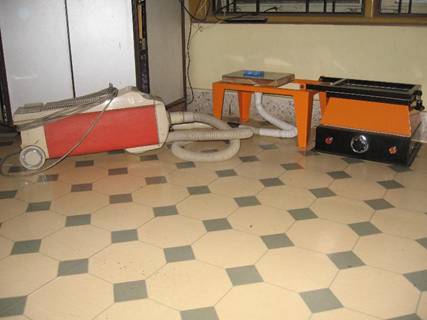
The photgraph below shows both the units side by side. Finally, the
two were bolted on a wooden platform to make it as one complete unit. The
rectangular black colored frame used for holding the plastic sheet swings
around and sits exactly over the heater. The orange colored cover around the
heater element is purposely made with 4
inch height. With heater element slightly in raised position, there must be
enough clearance between the sagging
plastic material and the heater element. If the sag is too much the plastic
sheet may touch the heater and catch fire. This may the reason that many vacuum
forming machines apply heat from heaters placed on the top side of the plastic
sheet to be heated.A domestic vacuum cleaner connected to the vacuum table is
seen in the photograph. The frame is seen resting over the heater cover, with a
pvc sheet clamed in it. The photograph at the end is that of a pvc bowl made
out of 0.2 mm thick film, using this set up.
|
|
|
|
|
|